There are many ways using which developers get updates from Python. Some use the ‘knockknock’ library, some use the ‘wandb’ package to track the progress and generate report, and so on. However, I recently found this nifty way of sending myself updates when, let us say, my machine/deep learning model has finished training or when my single-core-utilizing-python-code has finished executing which was taking an awful amount of time to do multiple simple lookups across a very large knowledge base (“been there, phew!").
This blog post tries to provide you with steps to setup your own Telegram bot which can send you messages via Python. Your message is something you can personalize given an error thrown or a successful model training, but it will be a simple message notifying you that the process execution has come to a halt and you should probably tell your machine what to do next. I mean we have not yet developed smart ML/DL training processes which take care of all the possible model training and hyperparameter tuning on its own, right? :P
Yes, I know! but what if you wanted to have a look at the results and output on your own, and then change the hyperparameters accordingly?
Motivated enough to do this? Let us get on with it!
Requirements
👉 A Telegram Account: If you don’t have the Telegram app installed just download it from the play store. After downloading create an account using your mobile number just like WhatsApp.
👉 python-telegram-bot library: We will need a library module called python-telegram-bot. This library provides a pure Python interface for the Telegram Bot API. It’s compatible with Python versions 3.6.8+. In addition to the pure API implementation, this library features a number of high-level classes to make the development of bots easy and straightforward. These classes are contained in the “telegram.ext” submodule. For more information, you can check their official GitHub repo.
It is a very simple process but has many steps so bear with me please.
Step 1: Setup your own Bot!
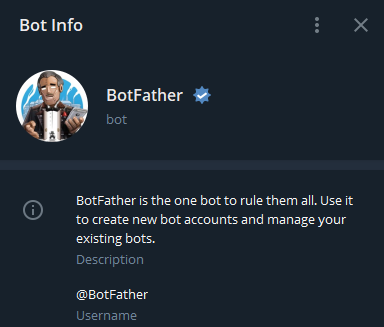
- Contact @BotFather on Telegram- Try to find this user in Telegram via your Phone application (Android or iOS) or via the PC version / macOS Version of the app downloadable via the official Telegram website. Here is what @BotFather looks like (just in case!).
👉 Start the conversation with BotFather by pressing the ‘Start’ button, and you will see a command ‘/start’ initiate the conversation.
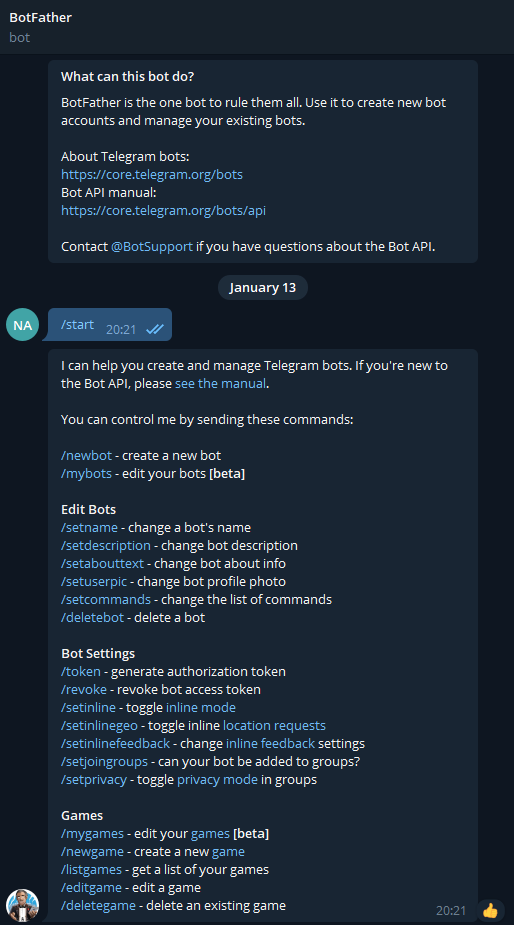
👉 Now, type in the command to create a new bot to yourself ‘/newbot’ and send this message. But wait, it will ask you various questions as shown below and help you setup this bot for you. It will ask you for a name (as you can see I was going for a name with an emoji which it denied me!); and you can also choose the bot picture there itself by sending it a picture or you can change it later.
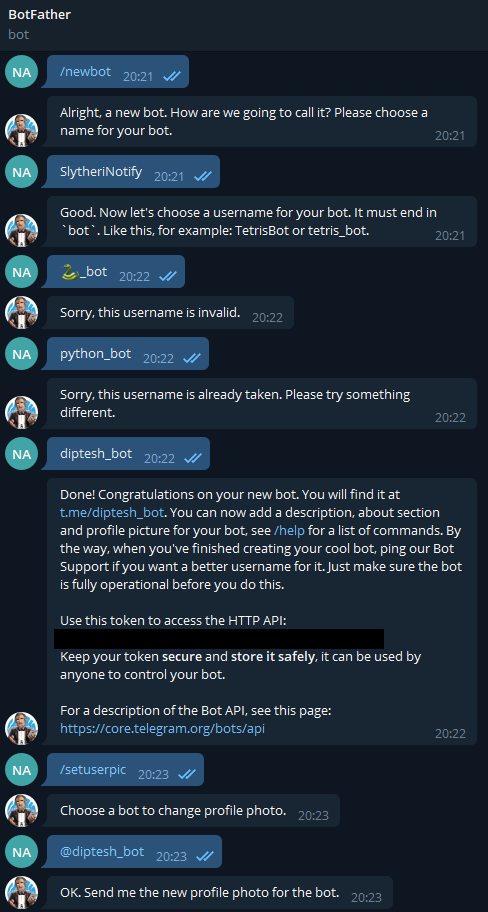
👉 You can see that I have redacted my token ID from the picture, but please copy your token ID and keep it noted as you will need it for steps further.
DISCLAIMER — Please save the token ID of the bot securely. Anyone with your token ID can manipulate this bot.
👉 Start a 💬 conversation with you bot but do not expect any replies yet. :) – Find the bot user on Telegram by using the username you had selected for the both. For example, the screenshot shows that my bot is named @diptesh_bot. Just write any message to it, say “Hi!".
👉 Go to the URL: https://api.telegram.org/bot<tokenID>/getUpdates where you need to replace <tokenID> with your own bot token ID identified from the step above.
👉 The page shown is the response from the Telegram API which lets you know what messages your bot has received. Do not worry, we don’t have to keep tabs on this page, we just need to 💬 (chat) ID from here and we shall move on to the Python codebase you need to setup. Look at the screenshot below and find the 💬 ID from your API response.
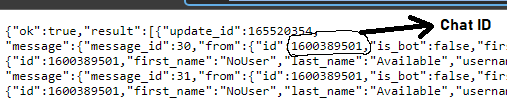
For example, you can see that my 💬 ID is 1600389501, note your 💬 ID down as it is going to be used along with the token ID in Python later.
Step 2: Setup your Python codebase!
-
The Python Setup- You can choose to go through the tutorials available on 💡 GeeksforGeeks or the one on 💡 CodeMentor. They appear on top of the Google search for ‘create telegram bot for python’. These tutorial provide you with a more extensive use of the API by the use of extended classes present with the python-telegram-bot library, however, you can also choose to complete this blog post tutorial which provides you with a simpler version of the same.
👉 Ensuring the code environment (optional) – Since some of us use conda environments and virtual environments to execute our code with specific libraries (and their versions! do not get me started about the versioning and pip!), it is a good idea to ensure that you install the telegram library in the right environment. So change the environment via your terminal and activate the one you are going to use this bot with.
👉 Install the library - Execute the following via Terminal or via your notebook 📚:
– For terminal
pip install python-telegram-bot– For notebooks, IDEs
!pip install python-telegram-bot👉 Once this installation finishes, open your code and simple add this cell as show below, or add it at the end of your code execution. In the code snippet shown below, replace the REDACTED-TOKEN-ID-FROM-POST with your token id inside the quotes, and use your 💬 ID you noted down earlier to replace 0000000000.
   import telegram
   bot = telegram.Bot(token="REDACTED-TOKEN-ID-FROM-POST")
   ## token ID needs to be obtained as shown earlier.
   bot.sendMessage(chat_id=0000000000, text="Training is done")
   ## chat_id needs to be obtained via the Telegram API as shown later.
Step 3: Execute!
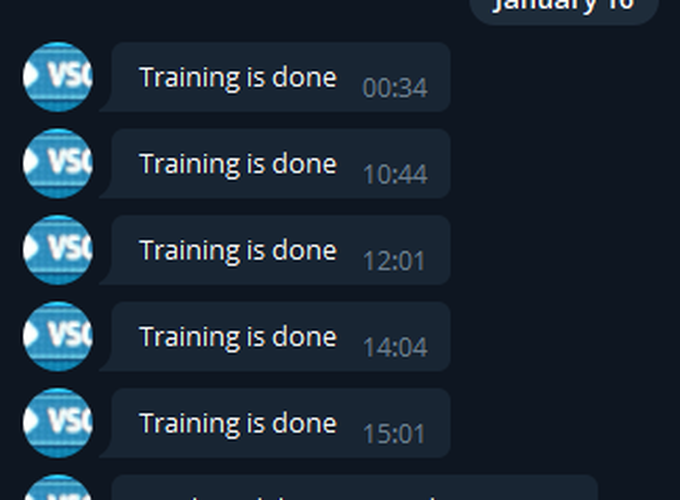
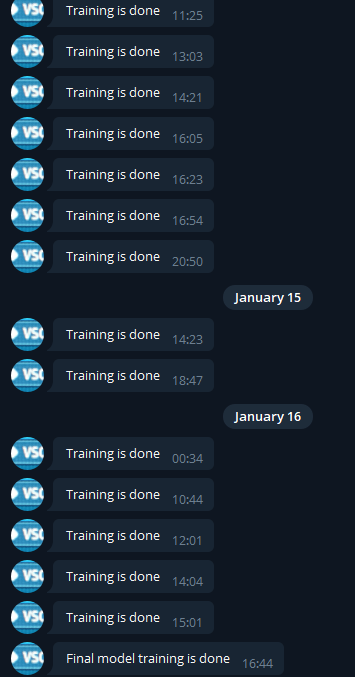
- Execute your code- To watch this bot in action, execute the code and at its successfull execution you shall see that you recieve the message “Training is done” via the bot. Now if you have Telegram installed on your phone, you will recieve this message as long as you have internet connection and the Telegram API server is not down (which will hopefully not be the case!). If you add this snippet at the end of each model tranining your bot will probably end up having one-sided conversation with you; something like this:
👉 More on this later, for now, setup this and have fun training models continously while getting progress notifications.
This ends the whole discussion on how to start getting notifications when your process execution comes to a halt using a Telegram bot. However, let us say you have co-authors, and all of you can run the code with different hyperparameters. Could you use the same steps above to send this message to a group? Why not create a telegram group and add your bot to it? Why not allow the bot to send messages to the group via a different 💬 ID? I will try this in a few days and create a new post.